[ad_1]
This weblog put up is co-written with Sid Wray and Jake Koskela from Salesforce, and Adiascar Cisneros from Tableau.
Amazon Redshift is a quick, scalable cloud knowledge warehouse constructed to serve workloads at any scale. With Amazon Redshift as your knowledge warehouse, you may run complicated queries utilizing refined question optimization to shortly ship outcomes to Tableau, which affords a complete set of capabilities and connectivity choices for analysts to effectively put together, uncover, and share insights throughout the enterprise. For purchasers who wish to combine Amazon Redshift with Tableau utilizing single sign-on capabilities, we launched AWS IAM Id Middle integration to seamlessly implement authentication and authorization.
IAM Id Middle offers capabilities to handle single sign-on entry to AWS accounts and functions from a single location. Redshift now integrates with IAM Id Middle, and helps trusted identification propagation, making it potential to combine with third-party identification suppliers (IdP) reminiscent of Microsoft Entra ID (Azure AD), Okta, Ping, and OneLogin. This integration positions Amazon Redshift as an IAM Id Middle-managed software, enabling you to make use of database role-based entry management in your knowledge warehouse for enhanced safety. Position-based entry management permits you to apply nice grained entry management utilizing row degree, column degree, and dynamic knowledge masking in your knowledge warehouse.
AWS and Tableau have collaborated to allow single sign-on help for accessing Amazon Redshift from Tableau. Tableau now helps single sign-on capabilities with Amazon Redshift connector to simplify the authentication and authorization. The Tableau Desktop 2024.1 and Tableau Server 2023.3.4 releases help trusted identification propagation with IAM Id Middle. This enables customers to seamlessly entry Amazon Redshift knowledge inside Tableau utilizing their exterior IdP credentials without having to specify AWS Id and Entry Administration (IAM) roles in Tableau. This single sign-on integration is obtainable for Tableau Desktop, Tableau Server, and Tableau Prep.
On this put up, we define a complete information for organising single sign-on to Amazon Redshift utilizing integration with IAM Id Middle and Okta because the IdP. By following this information, you’ll learn to allow seamless single sign-on authentication to Amazon Redshift knowledge sources immediately from inside Tableau Desktop, streamlining your analytics workflows and enhancing safety.
Answer overview
The next diagram illustrates the structure of the Tableau SSO integration with Amazon RedShift, IAM Id Middle, and Okta.
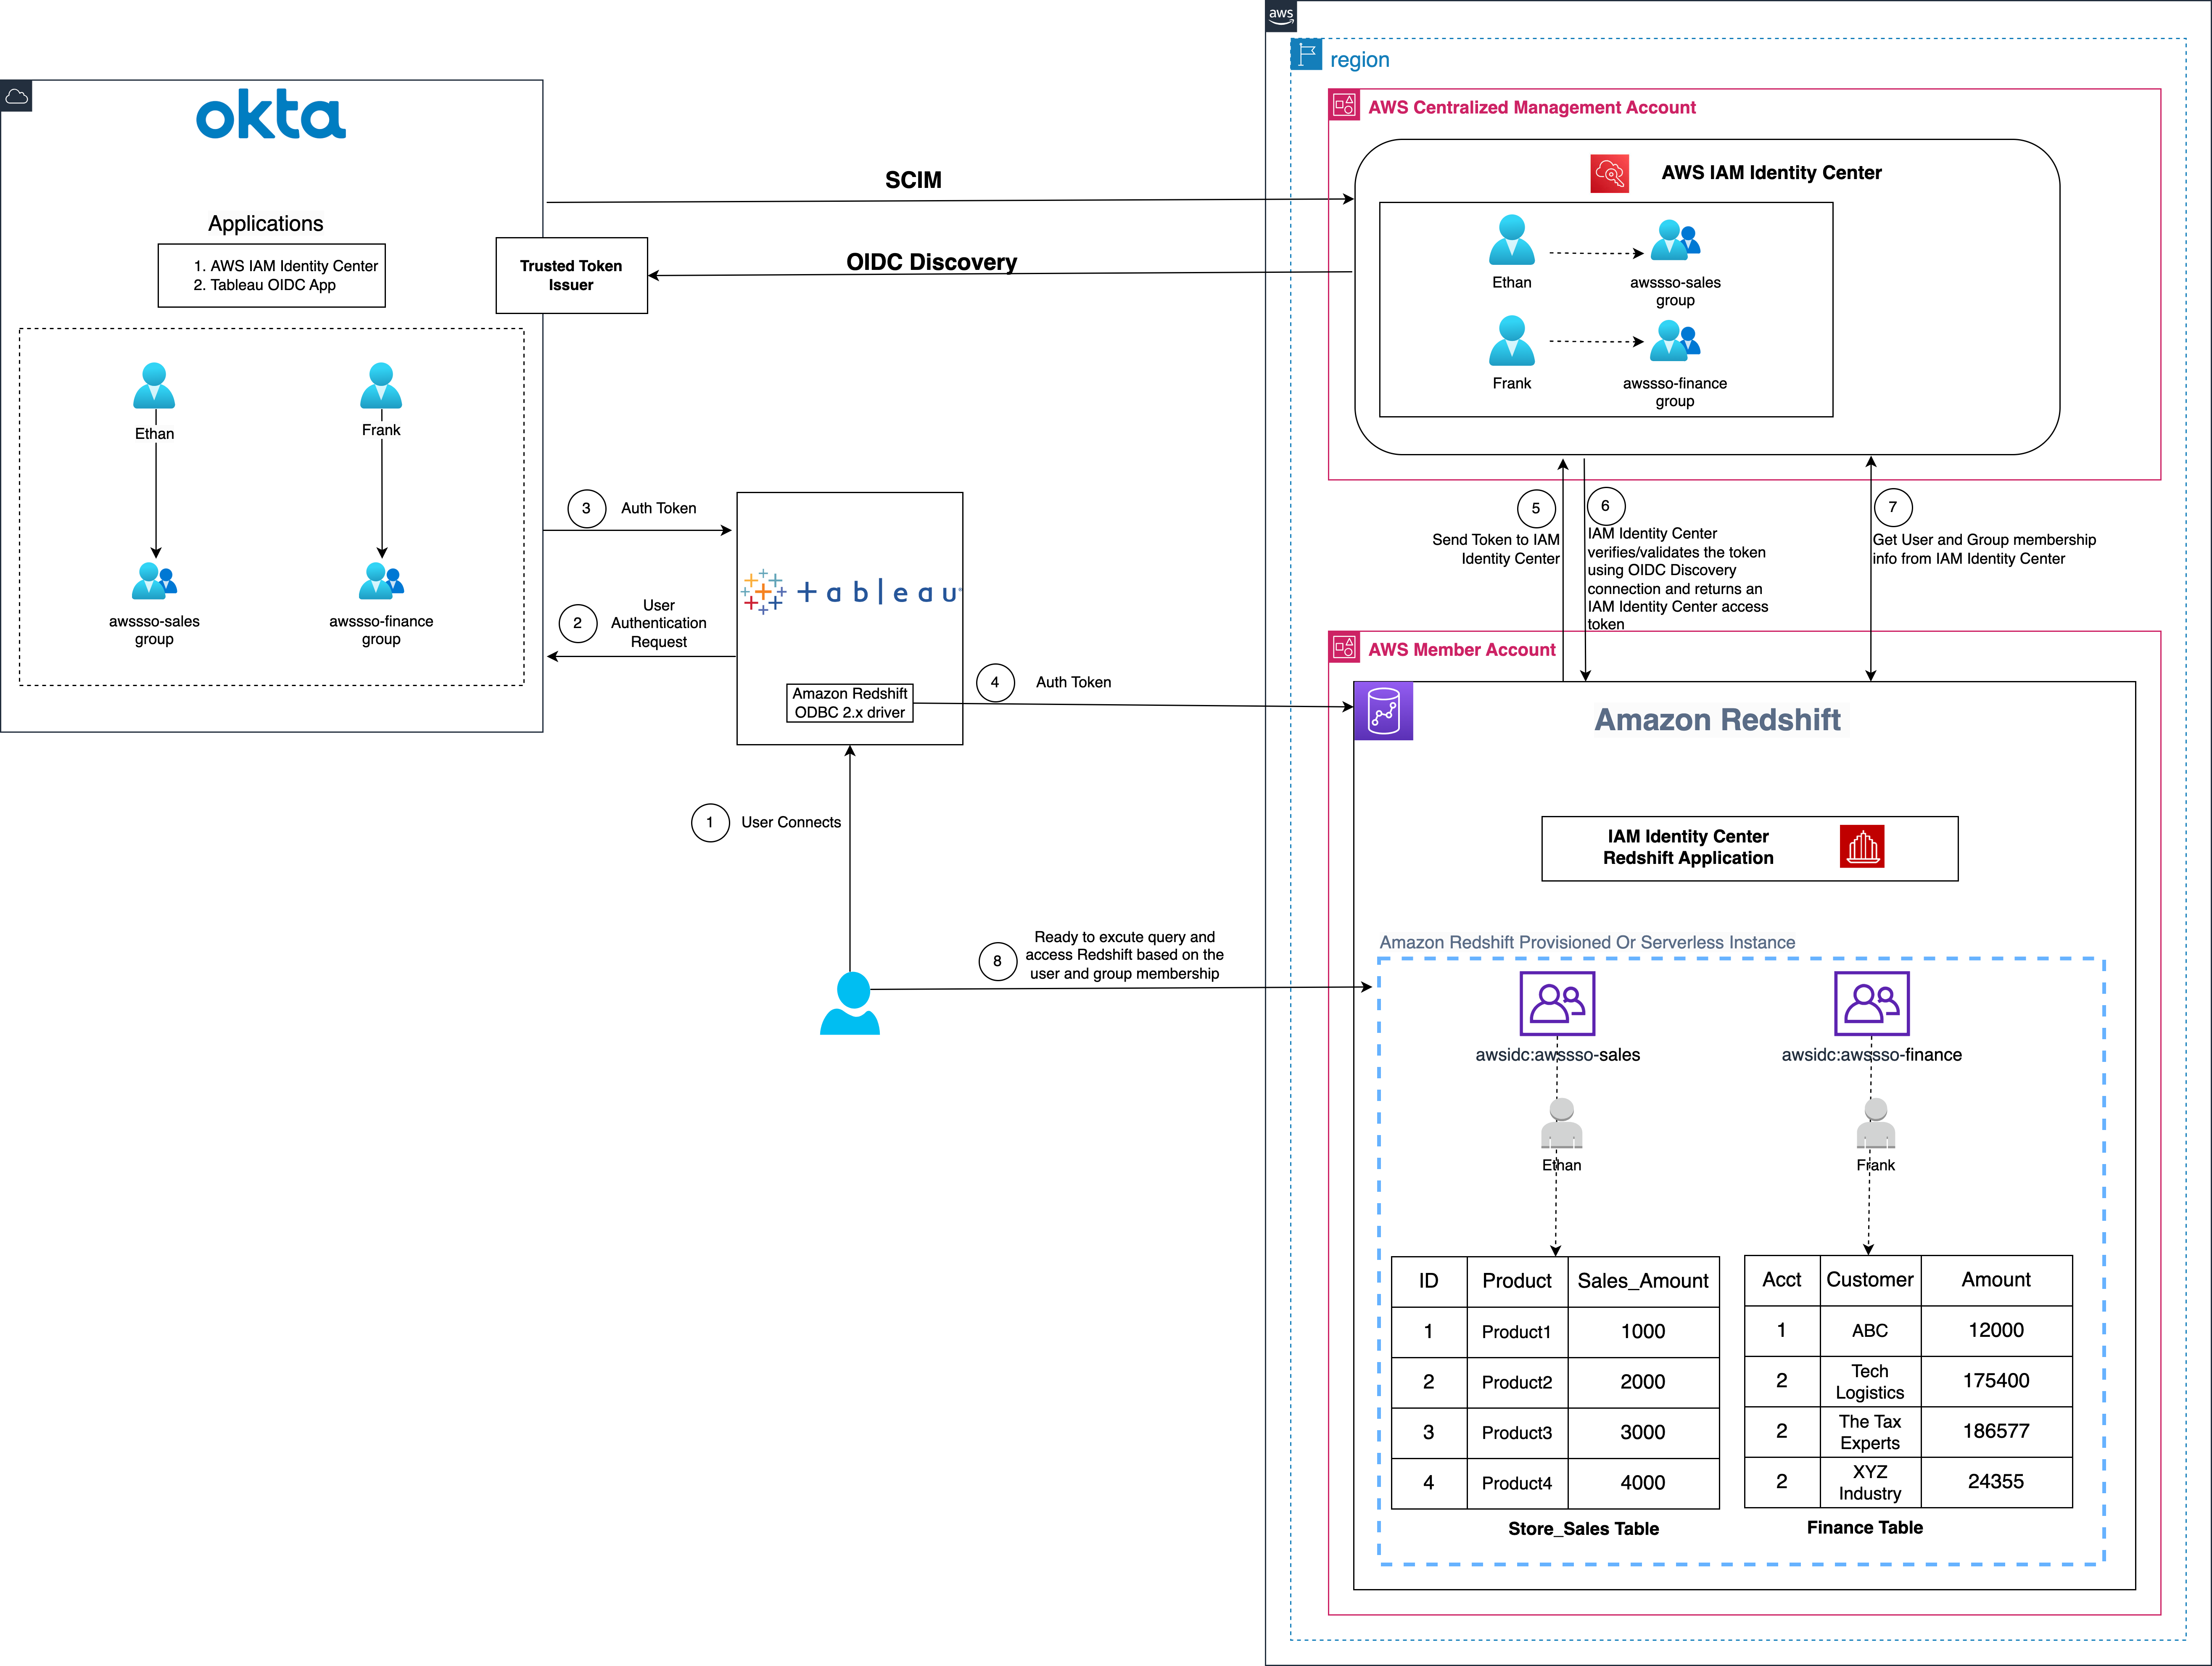
Determine 1: Answer overview for Tableau integration with Amazon Redshift utilizing IAM Id Middle and Okta
The answer depicted in Determine 1 contains the next steps:
- The person configures Tableau to entry Redshift utilizing IAM Id Middle authentication
- On a person sign-in try, Tableau initiates a browser-based OAuth circulate and redirects the person to the Okta login web page to enter the login credentials.
- On profitable authentication, Okta points an authentication token (id and entry token) to Tableau
- Redshift driver then makes a name to Redshift-enabled IAM Id Middle software and forwards the entry token.
- Redshift passes the token to Id Middle and requests an entry token.
- Id Middle verifies/validates the token utilizing the OIDC discovery connection to the trusted token issuer and returns an Id Middle generated entry token for a similar person. In Determine 1, Trusted Token Issuer (TTI) is the Okta server that Id Middle trusts to supply tokens that third-party functions like Tableau makes use of to name AWS companies.
- Redshift then makes use of the token to acquire the person and group membership info from IAM Id Middle.
- Tableau person will be capable of join with Amazon Redshift and entry knowledge primarily based on the person and group membership returned from IAM Id Middle.
Conditions
Earlier than you start implementing the answer, just be sure you have the next in place:
Walkthrough
On this walkthrough, you construct the answer with following steps:
- Arrange the Okta OIDC software
- Arrange the Okta authorization server
- Arrange the Okta claims
- Setup the Okta entry insurance policies and guidelines
- Setup trusted token issuer in AWS IAM Id Middle
- Setup shopper connections and trusted token issuers
- Setup the Tableau OAuth config information for Okta
- Set up the Tableau OAuth config file for Tableau Desktop
- Setup the Tableau OAuth config file for Tableau Server or Tableau Cloud
- Federate to Amazon Redshift from Tableau Desktop
- Federate to Amazon Redshift from Tableau Server
Arrange the Okta OIDC software
To create an OIDC internet app in Okta, you may comply with the directions on this video, or use the next steps to create the wep app in Okta admin console:
Be aware: The Tableau Desktop redirect URLs ought to at all times use localhost. The examples under additionally use localhost for the Tableau Server hostname for ease of testing in a check setting. For this setup, you must also entry the server at localhost within the browser. In the event you resolve to make use of localhost for early testing, additionally, you will have to configure the gateway to just accept localhost utilizing this tsm command:
In a manufacturing setting, or Tableau Cloud, you need to use the total hostname that your customers will entry Tableau on the net, together with https. If you have already got an setting with https configured, you might skip the localhost configuration and use the total hostname from the beginning.
- Check in to your Okta group as a person with administrative privileges.
- On the admin console, underneath Purposes within the navigation pane, select Purposes.
- Select Create App Integration.
- Choose OIDC – OpenID Join because the Signal-in methodology and Net Software because the Software kind.
- Select Subsequent.
- In Normal Settings:
- App integration identify: Enter a reputation to your app integration. For instance,
Tableau_Redshift_App. - Grant kind: Choose Authorization Code and Refresh Token.
- Signal-in redirect URIs: The sign-in redirect URI is the place Okta sends the authentication response and ID token for the sign-in request. The URIs have to be absolute URIs. Select Add URl and together with the default URl, add the next URIs.
http://localhost:55556/Callbackhttp://localhost:55557/Callbackhttp://localhost:55558/Callbackhttp://localhost/auth/add_oauth_token
- Signal-out redirect URIs: preserve the default worth as
http://localhost:8080. - Skip the Trusted Origins part and for Assignments, choose Skip group task for now.
- Select Save.
- App integration identify: Enter a reputation to your app integration. For instance,

Determine 2: OIDC software
- Within the Normal Settings part, select Edit and choose Require PKCE as further verification underneath Proof Key for Code Trade (PKCE). This feature signifies if a PKCE code problem is required to confirm shopper requests.
- Select Save.

Determine 3: OIDC App Overview
- Choose the Assignments tab after which select Assign to Teams. On this instance, we’re assigning awssso-finance and awssso-sales.
- Select Executed.

Determine 4: OIDC software group assignments
For extra info on creating an OIDC app, see Create OIDC app integrations.
Arrange the Okta authorization server
Okta permits you to create a number of customized authorization servers that you need to use to guard your personal useful resource servers. Inside every authorization server you may outline your personal OAuth 2.0 scopes, claims, and entry insurance policies. When you’ve got an Okta Developer Version account, you have already got a customized authorization server created for you known as default.
For this weblog put up, we use the default customized authorization server. In case your software has necessities reminiscent of requiring extra scopes, customizing guidelines for when to grant scopes, otherwise you want extra authorization servers with totally different scopes and claims, then you may comply with this information.

Determine 5: Authorization server
Arrange the Okta claims
Tokens include claims which might be statements in regards to the topic (for instance: identify, position, or e mail handle). For this instance, we use the default customized declare sub. Comply with this information to create claims.

Determine 6: Create claims
Setup the Okta entry insurance policies and guidelines
Entry insurance policies are containers for guidelines. Every entry coverage applies to a specific OpenID Join software. The foundations that the coverage accommodates outline totally different entry and refresh token lifetimes relying on the character of the token request. On this instance, you create a easy coverage for all shoppers as proven in Determine 7 that follows. Comply with this information to create entry insurance policies and guidelines.

Determine 7: Create entry insurance policies
Guidelines for entry insurance policies outline token lifetimes for a given mixture of grant kind, person, and scope. They’re evaluated in precedence order and after an identical rule is discovered, no different guidelines are evaluated. If no matching rule is discovered, then the authorization request fails. This instance makes use of the position depicted in Determine 8 that follows. Comply with this information to create guidelines to your use case.

Determine 8: Entry coverage guidelines
Setup trusted token issuer in AWS IAM Id Middle
At this level, you turn to organising the AWS configuration, beginning by including a trusted token issuer (TTI), which makes it potential to change tokens. This includes connecting IAM Id Middle to the Open ID Join (OIDC) discovery URL of the exterior OAuth authorization server and defining an attribute-based mapping between the person from the exterior OAuth authorization server and a corresponding person in Id Middle. On this step, you create a TTI within the centralized administration account. To create a TTI:
- Open the AWS Administration Console and navigate to IAM Id Middle, after which to the Settings web page.
- Choose the Authentication tab and underneath Trusted token issuers, select Create trusted token issuer.
- On the Arrange an exterior IdP to challenge trusted tokens web page, underneath Trusted token issuer particulars, do the next:
- For Issuer URL, enter the OIDC discovery URL of the exterior IdP that can challenge tokens for trusted identification propagation. The administrator of the exterior IdP can present this URL (for instance,
https://prod-1234567.okta.com/oauth2/default).
- For Issuer URL, enter the OIDC discovery URL of the exterior IdP that can challenge tokens for trusted identification propagation. The administrator of the exterior IdP can present this URL (for instance,
To get the issuer URL from Okta, sign up as an admin to Okta and navigate to Safety after which to API and select default underneath the Authorization Servers tab and replica the Issuer URL

Determine 9: Authorization server issuer
- For Trusted token issuer identify, enter a reputation to determine this trusted token issuer in IAM Id Middle and within the software console.
- Underneath Map attributes, do the next:
- For Id supplier attribute, choose an attribute from the checklist to map to an attribute within the IAM Id Middle identification retailer.
- For IAM Id Middle attribute, choose the corresponding attribute for the attribute mapping.
- Underneath Tags (optionally available), select Add new tag, enter a worth for Key and optionally for Worth. Select Create trusted token issuer. For details about tags, see Tagging AWS IAM Id Middle assets.
This instance makes use of Topic (sub) because the Id supplier attribute to map with E mail from the IAM identification Middle attribute. Determine 10 that follows exhibits the arrange for TTI.

Determine 10: Create Trusted Token Issuer
Setup shopper connections and trusted token issuers
On this step, the Amazon Redshift functions that change externally generated tokens have to be configured to make use of the TTI you created within the earlier step. Additionally, the viewers declare (or aud declare) from Okta have to be specified. On this instance, you might be configuring the Amazon Redshift software within the member account the place the Amazon Redshift cluster or serverless occasion exists.
- Choose IAM Id Middle connection from Amazon Redshift console menu.

Determine 11: Amazon Redshift IAM Id Middle connection
- Choose the Amazon Redshift software that you simply created as a part of the conditions.
- Choose the Consumer connections tab and select Edit.
- Select Sure underneath Configure shopper connections that use third-party IdPs.
- Choose the checkbox for Trusted token issuer which you will have created within the earlier part.
- Enter the aud declare worth underneath part Configure chosen trusted token issuers. For instance,
okta_tableau_audience.
To get the viewers worth from Okta, sign up as an admin to Okta and navigate to Safety after which to API and select default underneath the Authorization Servers tab and replica the Viewers worth.

Determine 12: Authorization server viewers
Be aware: The viewers declare worth should precisely match with IdP viewers worth in any other case your OIDC reference to third half software like Tableau will fail.
- Select Save.

Determine 13: Including Viewers Declare for Trusted Token Issuer
Setup the Tableau OAuth config information for Okta
At this level, your IAM Id Middle, Amazon Redshift, and Okta configuration are full. Subsequent, you might want to configure Tableau.
To combine Tableau with Amazon Redshift utilizing IAM Id Middle, you might want to use a customized XML. On this step, you utilize the next XML and exchange the values beginning with the $ signal and highlighted in daring. The remainder of the values might be stored as they’re, or you may modify them primarily based in your use case. For detailed info on every of the weather within the XML file, see the Tableau documentation on GitHub.
Be aware: The XML file shall be used for all of the Tableau merchandise together with Tableau Desktop, Server, and Cloud.
The next is an instance XML file:
Set up the Tableau OAuth config file for Tableau Desktop
After the configuration XML file is created, it have to be copied to a location for use by Amazon Redshift Connector from Tableau Desktop. Save the file from the earlier step as .xml and put it aside underneath DocumentsMy Tableau RepositoryOAuthConfigs.
Be aware: Presently this integration isn’t supported in macOS as a result of the Redshift ODBC 2.X driver isn’t supported but for MAC. Will probably be supported quickly.
Setup the Tableau OAuth config file for Tableau Server or Tableau Cloud
To combine with Amazon Redshift utilizing IAM Id Middle authentication, it’s essential to set up the Tableau OAuth config file in Tableau Server or Tableau Cloud
- Check in to the Tableau Server or Tableau Cloud utilizing admin credentials.
- Navigate to Settings.
- Go to OAuth Shoppers Registry and choose Add OAuth Consumer
- Select following settings:
- Connection Sort: Amazon Redshift
- OAuth Supplier: Custom_IdP
- Consumer ID: Enter your IdP shopper ID worth
- Consumer Secret: Enter your shopper secret worth
- Redirect URL: Enter
http://localhost/auth/add_oauth_token. This instance makes use of localhost for testing in an area setting. It is best to use the total hostname with https. - Select OAuth Config File. Choose the XML file that you simply configured within the earlier part.
- Choose Add OAuth Consumer and select Save.

Determine 14: Create an OAuth connection in Tableau Server or Tableau Cloud
Federate to Amazon Redshift from Tableau Desktop
Now you’re prepared to connect with Amazon Redshift from Tableau by means of federated sign-in utilizing IAM Id Middle authentication. On this step, you create a Tableau Desktop report and publish it to Tableau Server.
- Open Tableau Desktop.
- Choose Amazon Redshift Connector and enter the next values:
- Server: Enter the identify of the server that hosts the database and the identify of the database you wish to hook up with.
- Port: Enter 5439.
- Database: Enter your database identify. This instance makes use of
dev. - Authentication: Choose OAuth.
- Federation Sort: Choose Id Middle.
- Id Middle Namespace: You may depart this worth clean.
- OAuth Supplier: This worth ought to mechanically be pulled out of your configured XML. Will probably be the worth from the ingredient
oauthConfigId. - Choose Require SSL.
- Select Check in.

Determine 15: Tableau Desktop OAuth connection
- Enter your IdP credentials within the browser pop-up window.

Determine 16: Okta Login Web page
- When authentication is profitable, you will note the message proven in Determine 17 that follows.

Determine 17: Profitable authentication utilizing Tableau
Congratulations! You’re signed in utilizing IAM Id Middle integration with Amazon Redshift and are able to discover and analyze your knowledge utilizing Tableau Desktop.

Determine 18: Efficiently related utilizing Tableau Desktop
Determine 19 is a screenshot from the Amazon Redshift system desk (sys_query_history) exhibiting that person Ethan from Okta is accessing the gross sales report.

Determine 19: Consumer audit in sys_query_history
After signing in, you may create your personal Tableau Report on the desktop model and publish it to your Tableau Server. For this instance, we created and printed a report named SalesReport.
Federate to Amazon Redshift from Tableau Server
After you will have printed the report from Tableau Desktop to Tableau Server, sign up as a non-admin person and look at the printed report (SalesReport on this instance) utilizing IAM Id Middle authentication.
- Check in to the Tableau Server web site as a non-admin person.
- Navigate to Discover and go to the folder the place your printed report is saved.
- Choose the report and select Signal In.

Determine 20: Tableau Server Signal In
- To authenticate, enter your non-admin Okta credentials within the browser pop-up.

Determine 21: Okta Login Web page
- After your authentication is profitable, you may entry the report.

Determine 22: Tableau report
Clear up
Full the next steps to wash up your assets:
- Delete the IdP functions that you’ve got created to combine with IAM Id Middle.
- Delete the IAM Id Middle configuration.
- Delete the Amazon Redshift software and the Amazon Redshift provisioned cluster or serverless occasion that you simply created for testing.
- Delete the IAM position and IAM coverage that you simply created for IAM Id Middle and Amazon Redshift integration.
- Delete the permission set from IAM Id Middle that you simply created for Amazon Redshift Question Editor V2 within the administration account.
Conclusion
This put up lined streamlining entry administration for knowledge analytics through the use of Tableau’s functionality to help single sign-on primarily based on the OAuth 2.0 OpenID Join (OIDC) protocol. The answer allows federated person authentication, the place person identities from an exterior IdP are trusted and propagated to Amazon Redshift. You walked by means of the steps to configure Tableau Desktop and Tableau Server to combine seamlessly with Amazon Redshift utilizing IAM Id Middle for single sign-on. By harnessing this integration of a 3rd social gathering IdP with IAM Id Middle, customers can securely entry Amazon Redshift knowledge sources inside Tableau with out managing separate database credentials.
Listed under are key assets to study extra about Amazon Redshift integration with IAM Id Middle
Concerning the Authors
 Debu Panda is a Senior Supervisor, Product Administration at AWS. He’s an trade chief in analytics, software platform, and database applied sciences, and has greater than 25 years of expertise within the IT world.
 Sid Wray is a Senior Product Supervisor at Salesforce primarily based within the Pacific Northwest with almost 20 years of expertise in Digital Promoting, Information Analytics, Connectivity Integration and Id and Entry Administration. He at the moment focuses on supporting ISV companions for Salesforce Information Cloud.
 Adiascar Cisneros is a Tableau Senior Product Supervisor primarily based in Atlanta, GA. He focuses on the combination of the Tableau Platform with AWS companies to amplify the worth customers get from our merchandise and speed up their journey to useful, actionable insights. His background contains analytics, infrastructure, community safety, and migrations.
 Jade Koskela is a Principal Software program Engineer at Salesforce. He has over a decade of expertise constructing Tableau with a concentrate on areas together with knowledge connectivity, authentication, and identification federation.
 Harshida Patel is a Principal Options Architect, Analytics with AWS.
 Maneesh Sharma is a Senior Database Engineer at AWS with greater than a decade of expertise designing and implementing large-scale knowledge warehouse and analytics options. He collaborates with numerous Amazon Redshift Companions and prospects to drive higher integration.
 Ravi Bhattiprolu is a Senior Associate Options Architect at Amazon Net Providers (AWS). He collaborates with strategic unbiased software program vendor (ISV) companions like Salesforce and Tableau to design and ship progressive, well-architected cloud merchandise, integrations, and options to assist joint AWS prospects obtain their enterprise targets.
[ad_2]
Leave a Reply